Introduction
Things is one of the most trend topics of the actuality and the next years, simply because devices is now getting connected around the world, with the ability to communicate, collect and share data. Therefore, embedded devices which can access the network and be controlled remotely are the great actors of this topic.
Bellow, there is a video regarding all the concepts and the steps to conclude this tutorial.
It's important to keep in mind that like other IT areas, the Internet of Things has being characterized with this role due to the convergence of multiple technologies, real-time analytics, machine learning, commodity sensors, and embedded systems. Traditional fields of embedded systems, wireless sensor networks, control systems, automation, (including home and building automation), and others all contribute to enabling the Internet of Things. Thus, projects in this area will involve a basic knowledge of all related areas.
All the communication between the devices will rely on the cloud, another trend topic that is capable to turn remote connection much easier. So, the Amazon has leading this market with a bunch of services, and Internet of Things is inserted in one of these services.
The AWS IoT Core is the web service that helps us to enables secure, bi-directional communication between Internet-connected things (such as sensors, actuators, embedded devices, or smart appliances) and the AWS Cloud over MQTT and HTTP. For more information you can take a look on the AWS IoT Core on :
One of the favorites microcontrollers of the time uses the ESP8266 chip, a microcontroller designed by the Chinese company Espressif. This chip has an Wifi shield that let you to connect in wireless networks doing TCP/IP connections. You can code it with different languages, and you can even use operational systems on that.
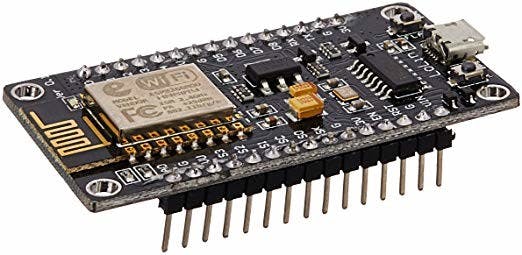
This is the NodeMCU development kit, one the most famous that uses the ESP chip. Today we will learn how to use that with Amazon IoT Core and arduino IDE to make a communication between ESP8266 and the IoT Core console. The communication protocol used is the MQTT, a protocol very used for small devices. For more information about MQTT protocol. (mqtt.org/faq).
Basic steps on AWS side
Create an amazon account to log on AWS Console
- Go to the Amazon Web Services home page.
- Create a new account as personal or professional.
- Add a payment method (It's only will cost you up to 3 USD for development and academic purposes)
- Log in into AWS console with your credentials.
Access IoT Core on the AWS Console
In order to make your first IoT device in AWS services, you will have to go to:
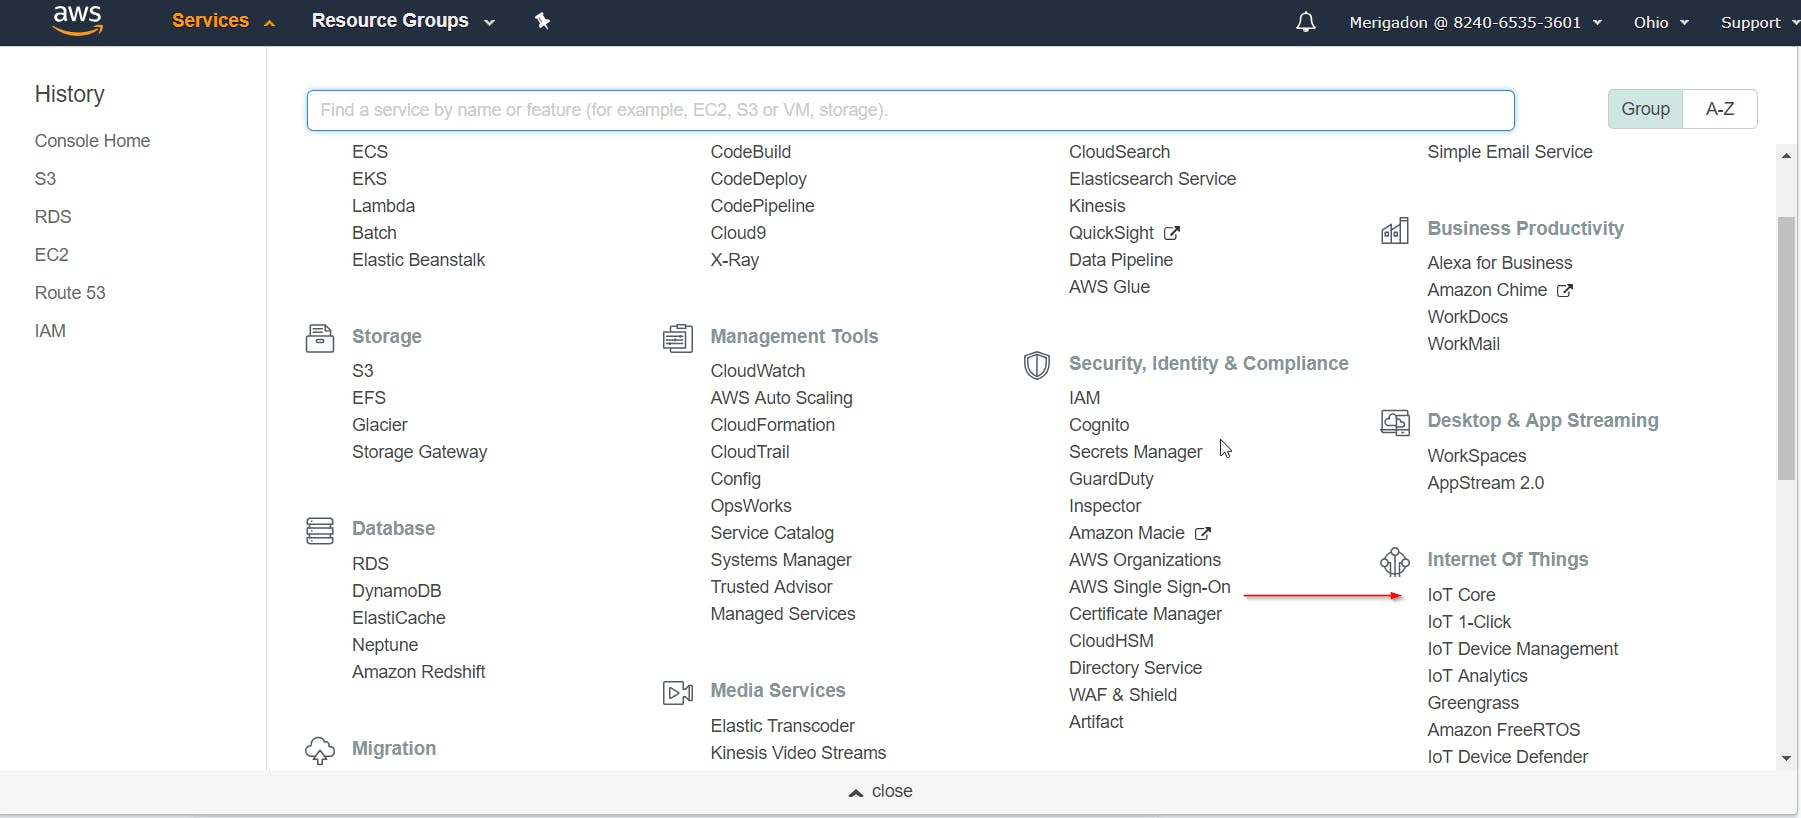
As some basic things has to be updated than follow my next guide that will help you how to create a Thing, and what are the ARN, EndPoint, and shadow on IoT Core console.
Create a Thing on IoT Core Console
Now that you have accessed the IoT Core console, on the sidebar go to Manage -> Things, and on the right corner just hit create.
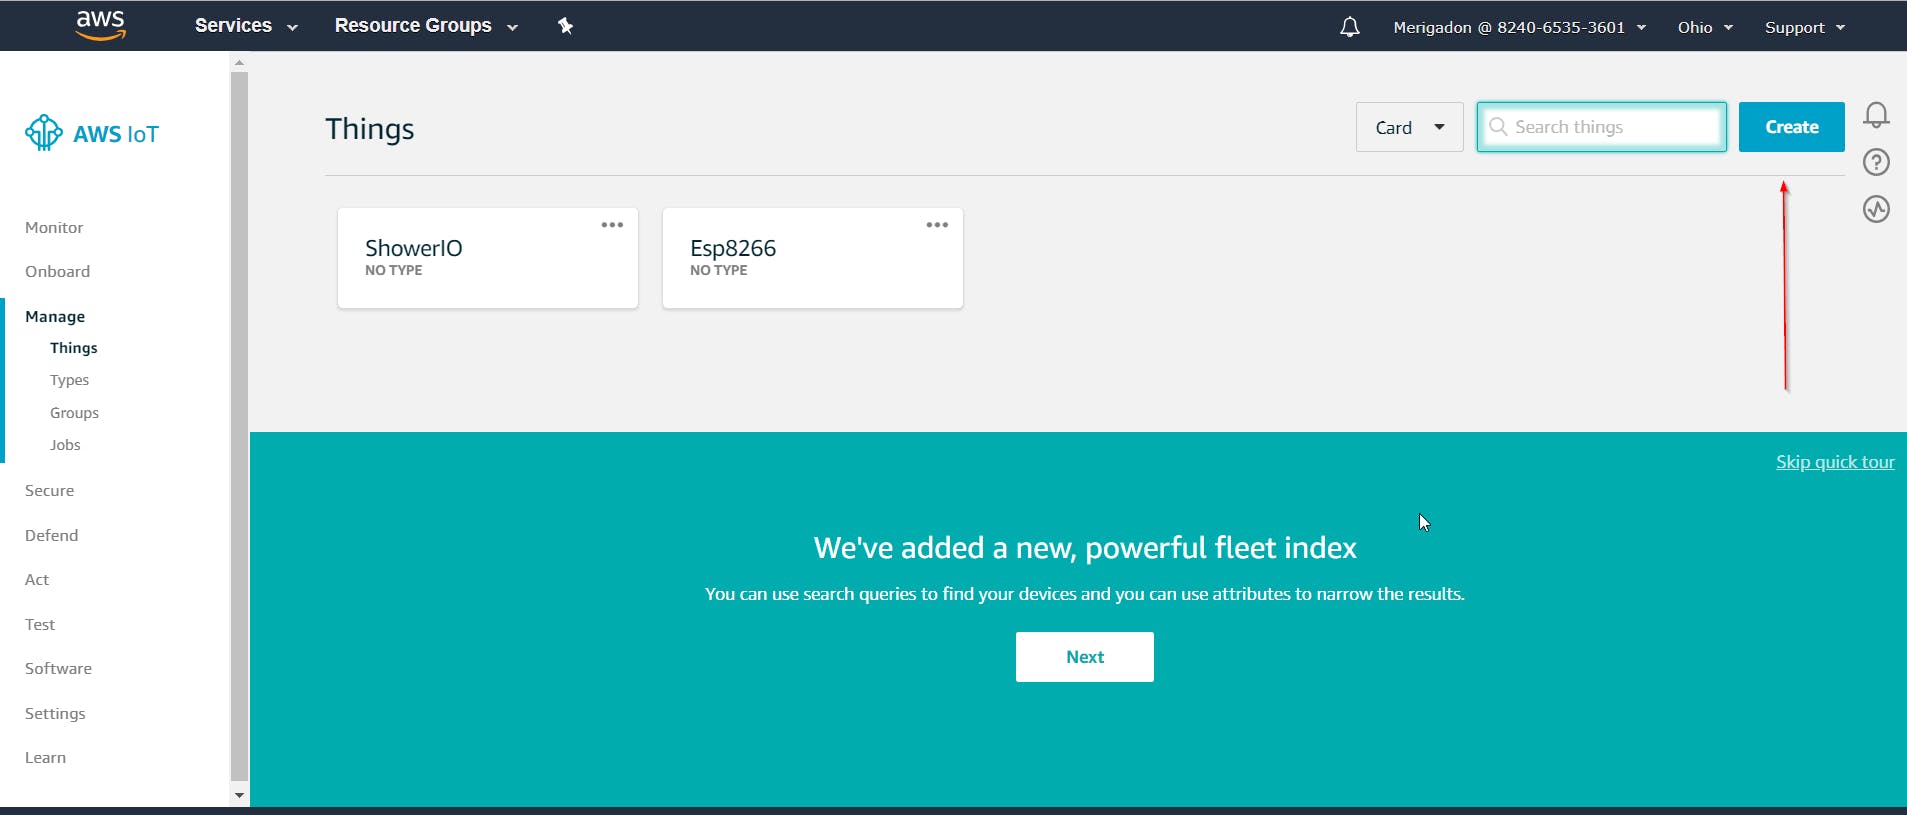
After this select the option Create a Single Thing, and as we are doing this guide only for learning purposes, just give a name to the device, and don't change any other option, and even don't create a certificate at this time.
So, after the device is created you can go into device's options, and among a lot of options here, we will have two of them that it's important for us at this time.
- Shadow - A JSON document used to store and retrieve current state information for a device. Summarizing it's MQTT topics that you can publish messages in JSON format.
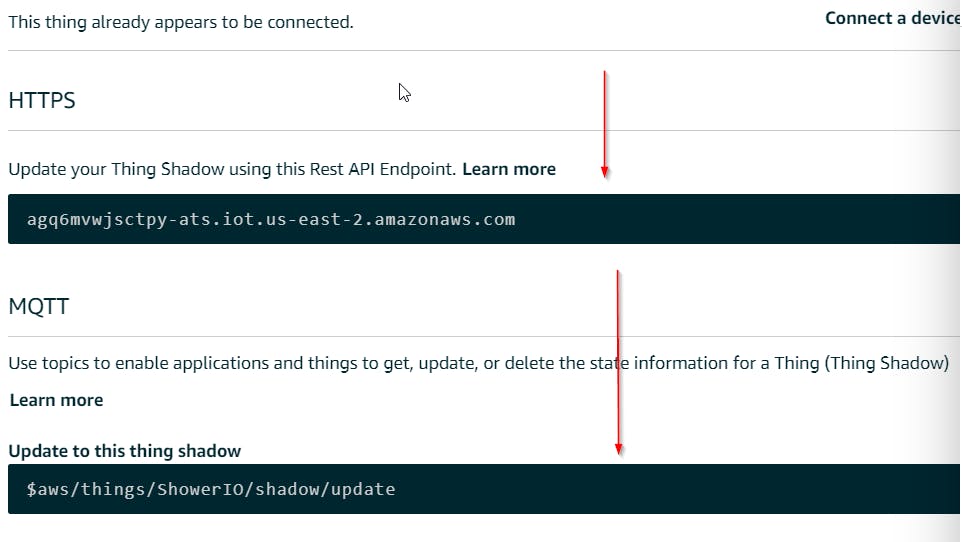
- Interact - On this option you will able to see the REST endpoint to communicate with your device, and some default MQTT topics for your shadow. Take note of the device endpoint and the update shadow topic, like the next image:
IAM - Authorizathion for IoT Services
In Amazon web services, the IAM (Identity Access Management) is responsible for controlling, and creating users of your web services. Besides, in this console you can set roles and policies to restrict or give authorization of what your users can use or not. These users are not the users of your applications, but users that will access your web services.
For example, imagine that you have a team of developers, whom are developing a mobile application in the cloud. Thus, every developer will have an user on your console with their respective authorities.
So, If don't have any user let's create an user for you with administrator roles, remembering that is a good practice creating a user for you, because your root user of your web services has to be used only in extreme cases. So, now search for IAM on your AWS Console.
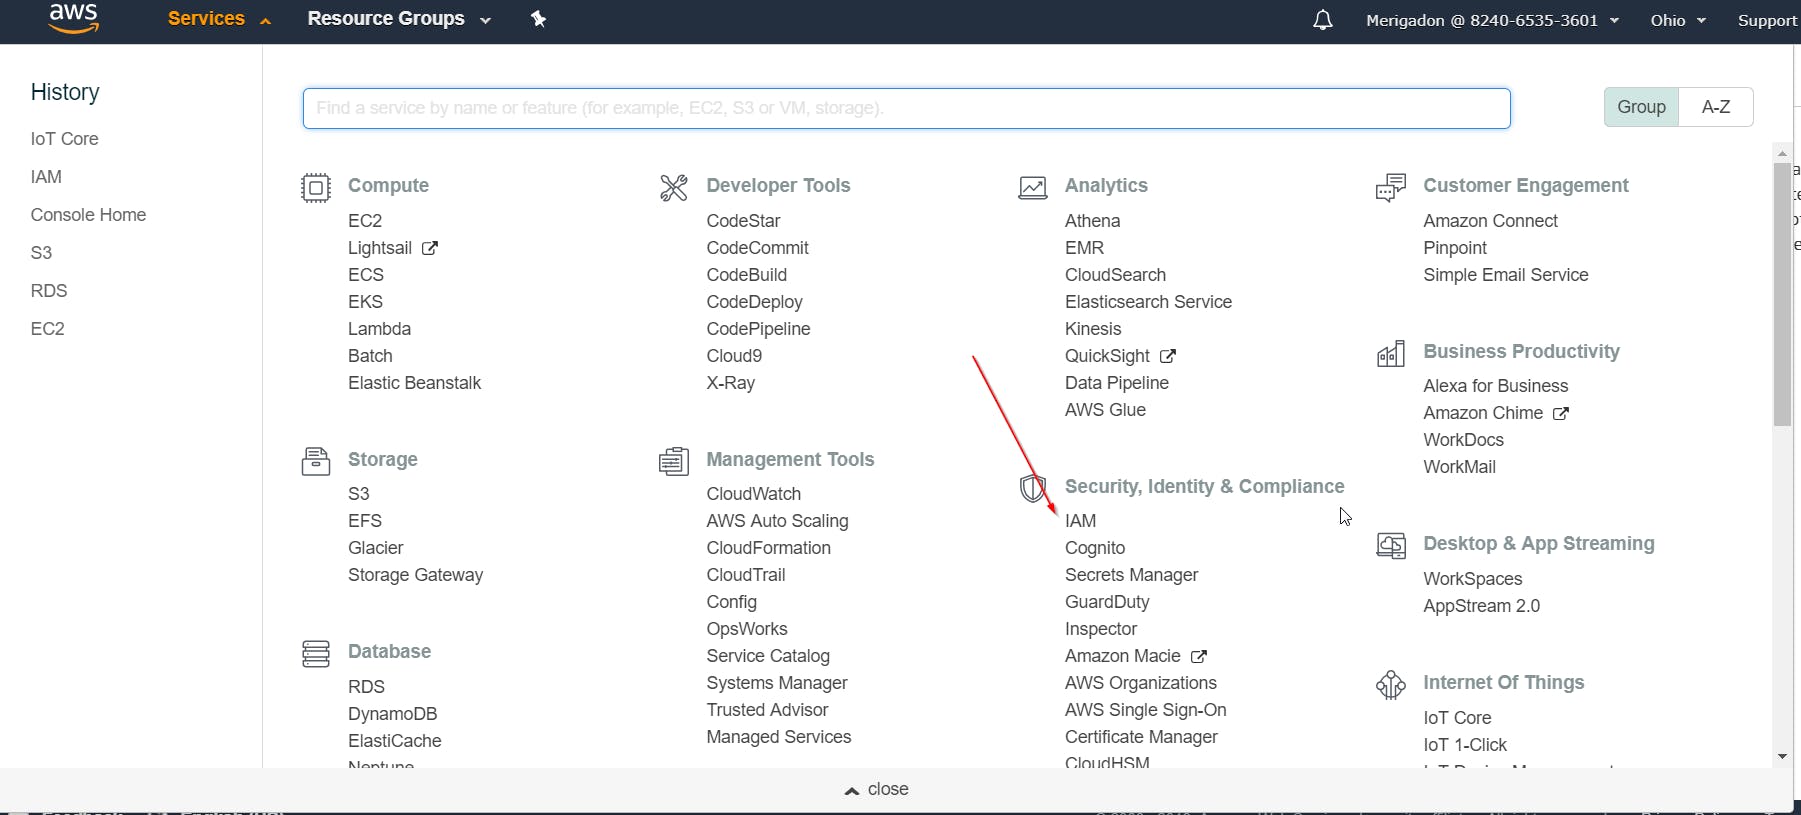
On the IAM sidebar, go to Users -> Add user. Put your username and select Programmatic access as an access type.
After that, attach existing policies to your user. In this guide we will give administrator access to the user, but you can give the user the police AWSIoTFullAccess, therefore this user will be only able to use IoT Core services.

After the user is created, you will be able to download the Access key ID, and Secret Access Key. Get the .csv file with the key/secret that we will use on the ESP8266 code.
Now that the device(Thing) in the AWS IoT Core console is created, you have to note some AWS information that was retrieved in the last steps. They are:
- AWS-Endpoint - The endpoint of your created Thing, and where all communications will be established.
- AWS-KEY / AWS-Secret - This key/secret is generated when you create a new user on IAM(Identity Access Management) console.
- AWS-Region - Your Thing was created in some of the AWS availability zones, please note where you've created it.
These information will be used in the ESP8266 code to handle you connect to your created Thing. In the IAM section where you can create a key pair with the key and secret for an user, it is a good practice creating a new user (and grant just IoT services permission). Avoid use the key/secret key of your main AWS console user. Now that the AWS section was covered, let's move to the ESP8266 section.
Basic steps on ESP8266 Side
Download Arduino IDE and Prepare it to upload codes in your ESP8266
In this tutorial, we are using the arduino IDE to develop and upload the code into the ESP8266, so first of all download the arduino IDE with the link:
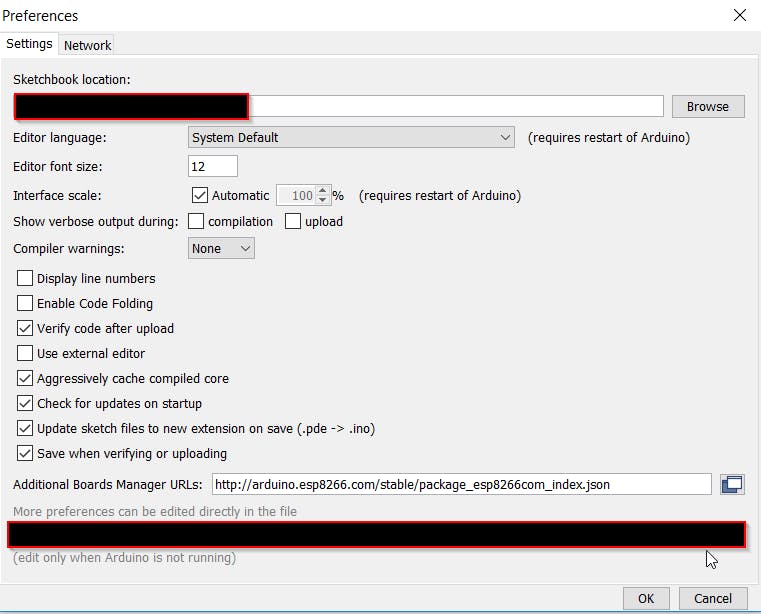
With the IDE installed, go to preferences on the File menu, and paste the url in the additional boards manager URL's:
arduino.esp8266.com/stable/package_esp8266c..
This will download the board manger to the development kits with the ESP chip, and your screen should look like this:
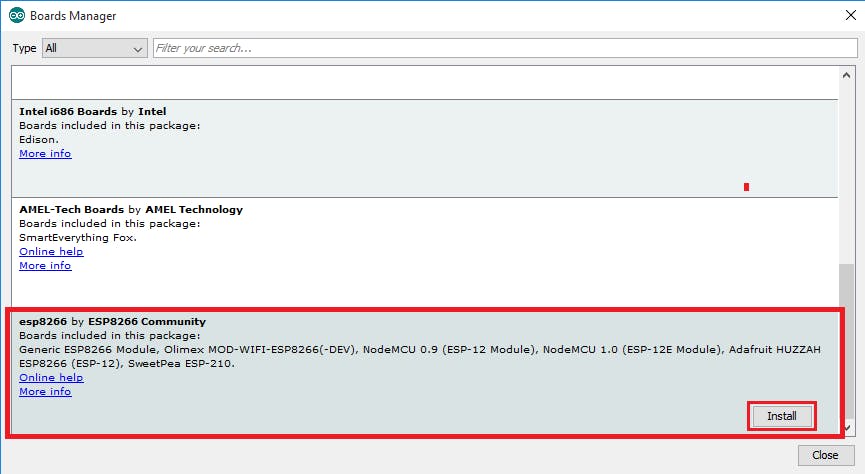
Now go to Tools-> Board-> Board Manager and search for esp8266 installing the esp8266 by ESP8266 Community, like the next image:
If you have the NodeMCU development kit like the one in this tutorial first image, you will have to select your development kit to point out it to your IDE. You can go to: Tools-> Board-> . If you have the NodeMCU your screen should look like this:
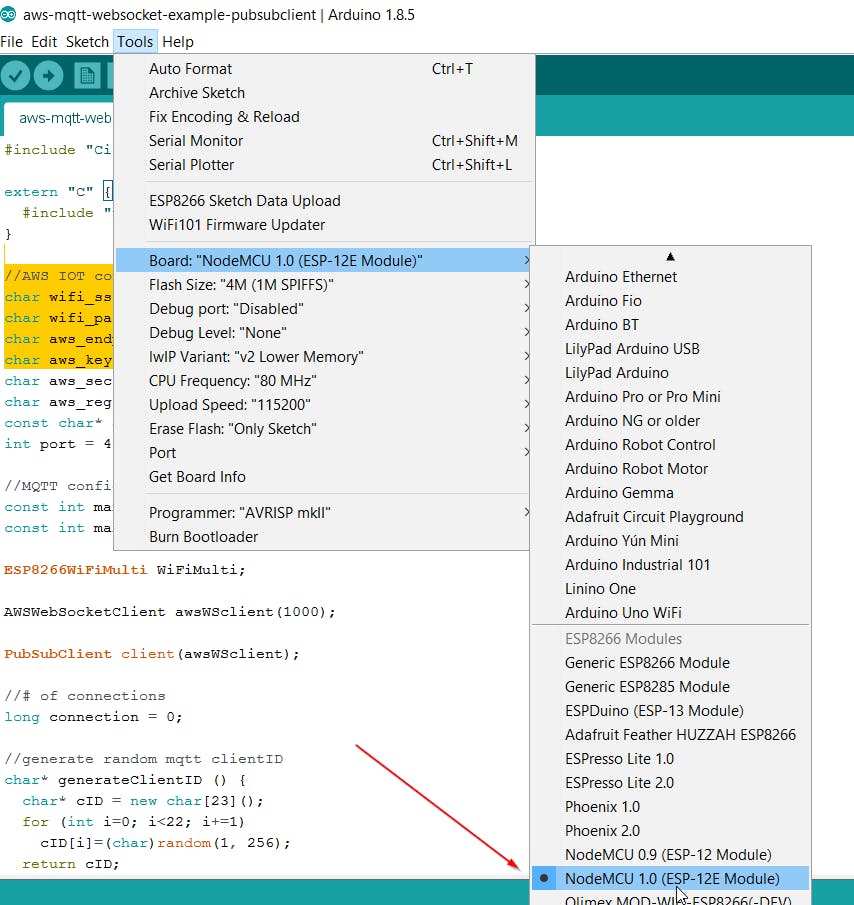
After that we are ready to go with the code, I will send the complete code here with a few comments on each part to explain how does it work, but summarizing the execution of the code:
- Your device will try to connect on your wifi access point by the credentials you provided
- After connected to internet, the AWS parameters will be set with the region, endpoint, key and secret you have provided.
- After all parameters set, the connect() function will be called in order to connect to AWS server, and if it's successful it will subscribe a MQTT topic and publish a message in the topic. You can specify your shadow topic to first test the connection between IoT Core and your device.
- So remember to change the AWS parameters on the initial part of the code.
#include <Arduino.h>
#include <Stream.h>


#include <ESP8266WiFi.h>
#include <ESP8266WiFiMulti.h>


//AWS
#include "sha256.h"
#include "Utils.h"


//WEBSockets
#include <Hash.h>
#include <WebSocketsClient.h>


//MQTT PUBSUBCLIENT LIB
#include <PubSubClient.h>


//AWS MQTT Websocket
#include "Client.h"
#include "AWSWebSocketClient.h"
#include "CircularByteBuffer.h"


extern "C" {
  #include "user_interface.h"
}


//AWS IOT config, change these:
char wifi_ssid[]       = "your-ssid";
char wifi_password[]   = "your-password";
char aws_endpoint[]    = "your-endpoint.iot.eu-west-1.amazonaws.com";
char aws_key[]         = "your-iam-key";
char aws_secret[]      = "your-iam-secret-key";
char aws_region[]      = "eu-west-1";
const char* aws_topic  = "$aws/things/your-device/shadow/update";
int port = 443;


//MQTT config
const int maxMQTTpackageSize = 512;
const int maxMQTTMessageHandlers = 1;


ESP8266WiFiMulti WiFiMulti;


AWSWebSocketClient awsWSclient(1000);


PubSubClient client(awsWSclient);


//# of connections
long connection = 0;


//generate random mqtt clientID
char* generateClientID () {
  char* cID = new char[23]();
  for (int i=0; i<22; i+=1)
    cID[i]=(char)random(1, 256);
  return cID;
}


//count messages arrived
int arrivedcount = 0;


//callback to handle mqtt messages
void callback(char* topic, byte* payload, unsigned int length) {
  Serial.print("Message arrived [");
  Serial.print(topic);
  Serial.print("] ");
  for (int i = 0; i < length; i++) {
    Serial.print((char)payload[i]);
  }
  Serial.println();
}


//connects to websocket layer and mqtt layer
bool connect () {


    if (client.connected()) {
        client.disconnect ();
    }
    //delay is not necessary... it just help us to get a "trustful" heap space value
    delay (1000);
    Serial.print (millis ());
    Serial.print (" - conn: ");
    Serial.print (++connection);
    Serial.print (" - (");
    Serial.print (ESP.getFreeHeap ());
    Serial.println (")");


    //creating random client id
    char* clientID = generateClientID ();

    client.setServer(aws_endpoint, port);
    if (client.connect(clientID)) {
      Serial.println("connected");
      return true;
    } else {
      Serial.print("failed, rc=");
      Serial.print(client.state());
      return false;
    }

}


//subscribe to a mqtt topic
void subscribe () {
    client.setCallback(callback);
    client.subscribe(aws_topic);
   //subscript to a topic
    Serial.println("MQTT subscribed");
}


//send a message to a mqtt topic
void sendmessage () {
    //send a message
    char buf[100];
    strcpy(buf, "{\"state\":{\"reported\":{\"on\": false}, \"desired\":{\"on\": false}}}");
    int rc = client.publish(aws_topic, buf);
}


void setup() {
    wifi_set_sleep_type(NONE_SLEEP_T);
    Serial.begin (115200);
    delay (2000);
    Serial.setDebugOutput(1);


    //fill with ssid and wifi password
    WiFiMulti.addAP(wifi_ssid, wifi_password);
    Serial.println ("connecting to wifi");
    while(WiFiMulti.run() != WL_CONNECTED) {
        delay(100);
        Serial.print (".");
    }
    Serial.println ("\nconnected");


    //fill AWS parameters
    awsWSclient.setAWSRegion(aws_region);
    awsWSclient.setAWSDomain(aws_endpoint);
    awsWSclient.setAWSKeyID(aws_key);
    awsWSclient.setAWSSecretKey(aws_secret);
    awsWSclient.setUseSSL(true);


    if (connect ()){
      subscribe ();
      sendmessage ();
    }


}


void loop() {
  //keep the mqtt up and running
  if (awsWSclient.connected ()) {
      client.loop ();
  } else {
    //handle reconnection
    if (connect ()){
      subscribe ();
    }
  }


}
So upload the code, into your ESP8266, remember that some dependencies has to be included. The github with the original code, and the dependencies can be found on:
So run the code, and if everything goes well, and if you've selected your shadow topic from the AWS Console, you will now able to see that the state has updated in IoT Core -> Shadow. Remember that an MQTT topic can be anything like an REST url, you can change the topic and test it with an MQTT client.
Thanks for everything, and if you have some doubt or something to add to this article, just ping me!

