

Android App + AWS IoT Core Guide


Introduction
Continuing the IoT guides, where in the last one we've talked about using the Amazon Web Service IoT Core with the microprocessor ESP8266 to subscribe and publishing topics using the MQTT protocol. In this one we are going to provide an explanation of how to build up an android app that can handles MQTT topics using AWS IoT core, and can be used together with the ESP8266 guide (linkedin.com/pulse/esp8266-aws-iot-core-gui..) to establish a remote connection between your mobile phone and a microprocessor, so you can serve any information that you want with your microprocessor and it will be available in real time anywhere in the world in your smartphone, thus the aim of this article is to provide a model (template) of how to establish a secure and fast connection between your devices, then you can use that in any IoT project.
The Importance of IoT growth
As the technology keeps evolving every second, the IoT concept has been one of the main topics for the next decades, and even centuries. Because, with the power of the internet and with the help of all communications protocols and the devices available today, everything can be connected, and this means not only profit to emerging companies on this ground, but benefits to everyone whom will use this produced services.
The IoT makes daily activities, and even critical activities faster and effective, and the examples of how this concept can be used starts in the micro coming from macro. The smart cities are the most famous example how cities and counties automating traffic management that effectively notices and governs the flow of traffic based on ever-changing conditions, parking applications that intelligently guide cars to open spots, eliminating wasted time and energy and dramatically cutting back on emissions, and these examples can be exported to health field like wearable devices that detect a host of health problems, potentially before they even occur, and immediately administer life-saving drugs or deploy emergency responders with detailed information placed instantly in their hands or alert family members as-needed. There is a great video that shows how use devices to monitor diabetic people, using IoT, azure and machine learning.
MQTT
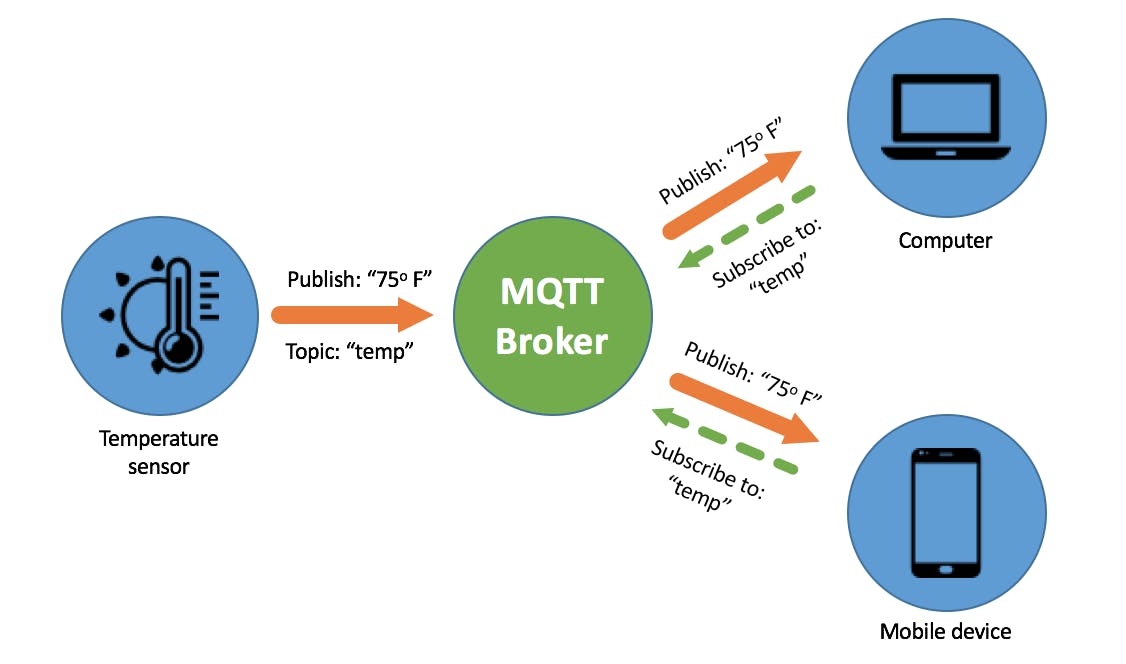
MQTT (MQ Telemetry Transport) is a lightweight messaging protocol that provides resource-constrained network clients with a simple way to distribute telemetry information. The protocol, which uses a publish/subscribe communication pattern, is used for machine-to-machine (M2M) communication and plays an important role in the internet of things (IoT).
MQTT enables resource-constrained IoT devices to send, or publish, information about a given topic to a server that functions as an MQTT message broker. The broker then pushes the information out to those clients that have previously subscribed to the client's topic. To a human, a topic looks like a hierarchical file path. Clients can subscribe to a specific level of a topic's hierarchy or use a wild-card character to subscribe to multiple levels.
The MQTT protocol is a good choice for wireless networks that experience varying levels of latency due to occasional bandwidth constraints or unreliable connections. Should the connection from a subscribing client to a broker get broken, the broker will buffer messages and push them out to the subscriber when it is back online. Should the connection from the publishing client to the broker be disconnected without notice, the broker can close the connection and send subscribers a cached message with instructions from the publisher.
The Project
In this guide we will use an already developed android app in a git repository provided by amazon, so we will delve into this project explaining each part, and how we can prepare the app for be used. The repository can be found on AndroidPubSubWebSocket repository.
First Steps
So, first clone the provided repository link, and be sure that you have an AWS account to settle up all the configuration on cloud-side. So, let's work first in the Amazon services and set all our cloud environment, and further we go to android project to make it work.
AWS Side
IAM Roles
In the AWS side, there are two main steps to be followed, first we will have to create some roles on IAM (Identity Access Management), that allows you to securely manage access to AWS services and resources. As in this app we will not use any kind of authentication, we have to create this role to specify to AWS that some devices can use services without being authenticated. Although, this is a theory and educational guide, it's not recommended to enable unauthenticated devices to use the services of your AWS account.
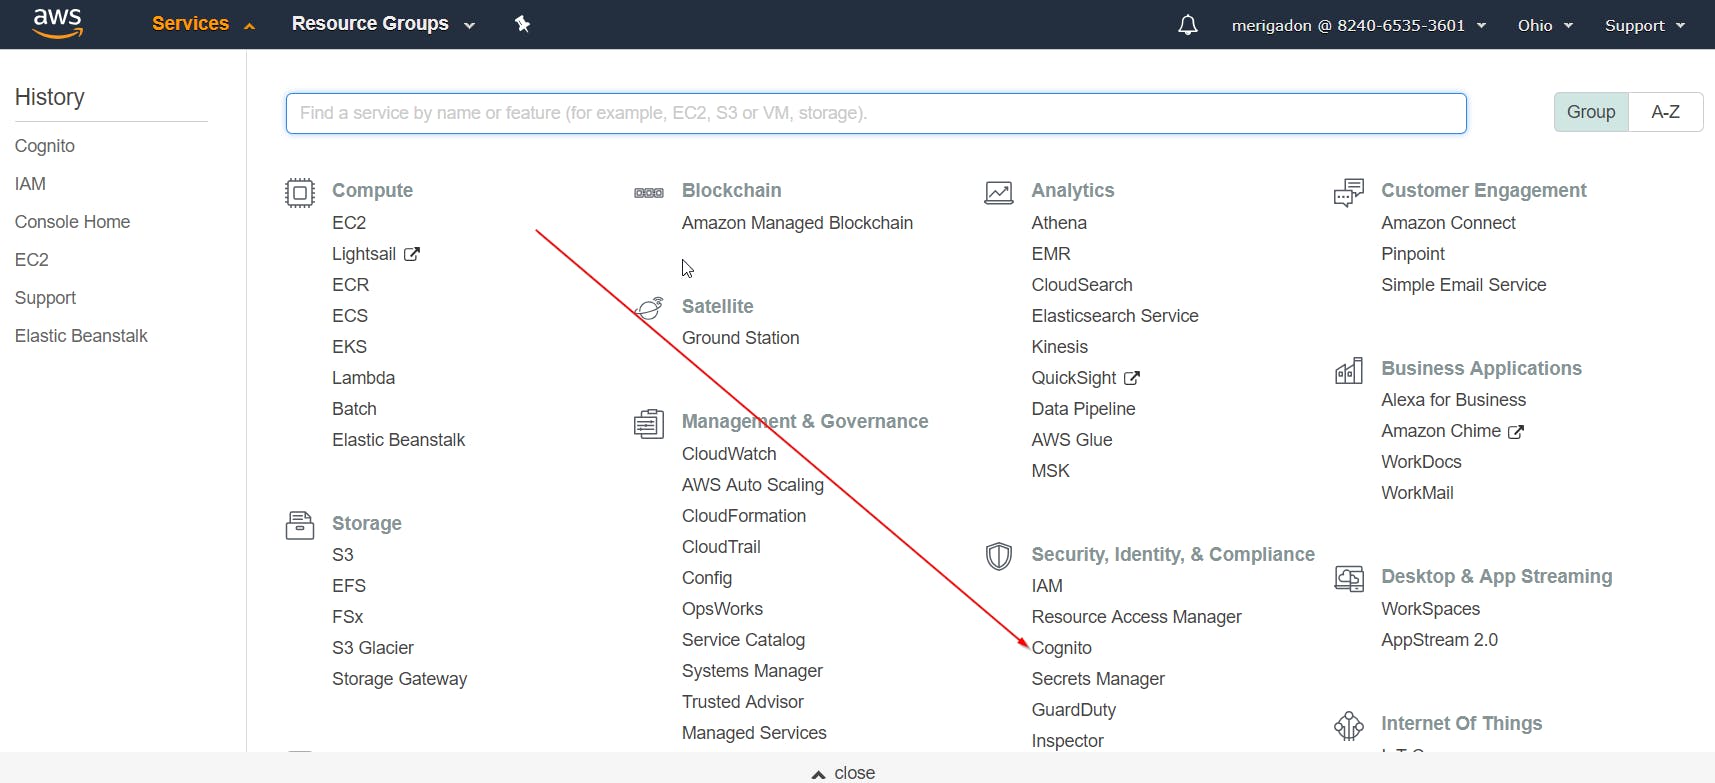
So, in your AWS console, go to Cognito -> Manage Identity Pools -> Federated Identities -> Create new identity pools:
Where you will be creating a federated identity pool to give access to your unauthenticated devices, and now you can give a name to the pool and select the option: Enable access to unauthenticated identities.
Once you have done, when creating the pool the console will request you to create two new roles on IAM, create these roles and go to IAM -> Roles and select the roles that you have created.

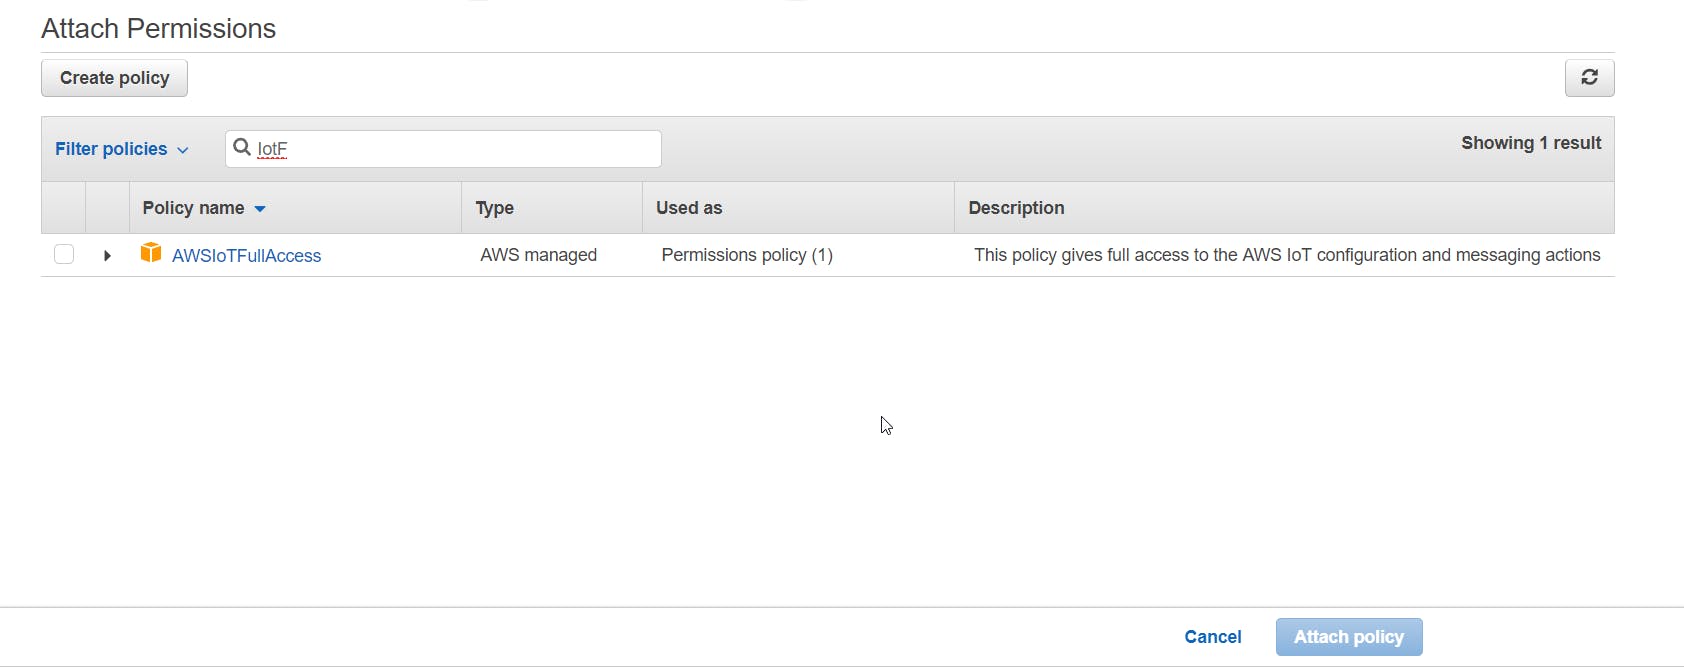
In the role menu that you have created, you will have to attach a policy giving some permissions to this role. Further, in the existing roles search for the AWSIoTFullAccess and attach it.
Now we are good to go to AWS IoT Core, but don't forget to note the Cognito Pool Id of the federated identity pool that you have created, we will use in the android app to provide the authentication path to the application.
Access IoT Core on the AWS Console
In order to make your first IoT device in AWS services, you will have to go to:
As some basic things has to be updated than follow my next guide that will help you how to create a Thing, and what are the ARN, EndPoint, and shadow on IoT Core console.
Create a Thing on IoT Core Console
Now that you have accessed the IoT Core console, on the sidebar go to Manage -> Things, and on the right corner just hit create.
After this select the option Create a Single Thing, and as we are doing this guide only for learning purposes, just give a name to the device, and don't change any other option, and even don't create a certificate at this time.
So, after the device is created you can go into device's options, and among a lot of options here, we will have two of them that it's important for us at this time.
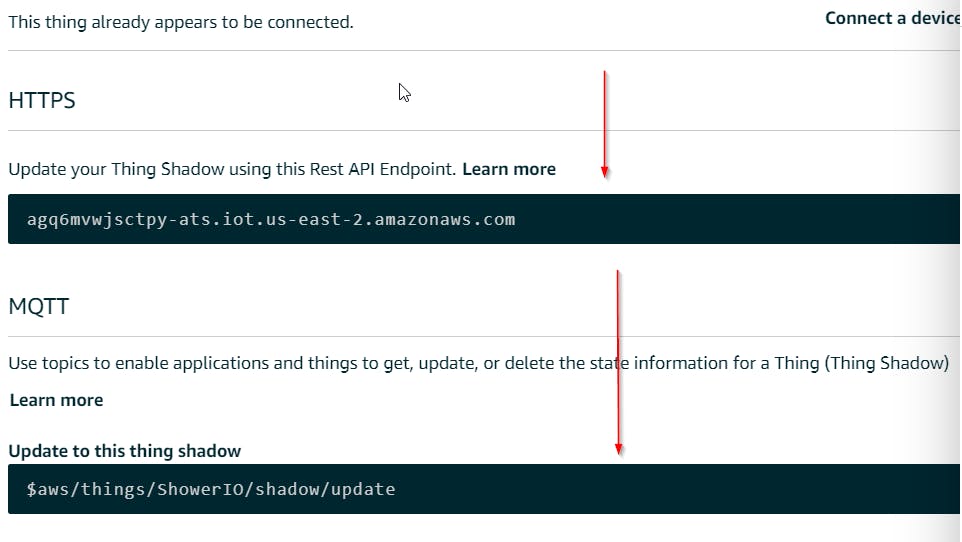
- Shadow - A JSON document used to store and retrieve current state information for a device. Summarizing it's MQTT topics that you can publish messages in JSON format.
- Interact - On this option you will able to see the REST endpoint to communicate with your device, and some default MQTT topics for your shadow. Take note of the device endpoint and the update shadow topic, like the next image:
Android Side
The android app only have the AWS SDK package as dependency, if you are using Android Stuido, it will download automatically for you when you import the project in your IDE, but if you are using Eclipse, you will have to download you will need to download the AWS SDK for Android (aws.amazon.com/mobile/sdk) and extract and copy these jars into the 'libs' directory for the project.
Layout
As this is a simply project, it has only a layout xml file, and an activity. In the layout file (activity_main.xml) you will not have to change anything, unless you would like to change the actual GUI of the main activity. Summarizing, this layout is only some buttons and edit texts that will handle the subscribed MQTT topic, or publish a message, where each of them has an id to be bonded with some object in the main activity class. Although , this project is binding view elements in the common and tiring way, you should take a look at Butter Knife, a view binding method that makes the binding more easier and faster, turning your code more readable and clean.
Let's see the layout file:
<?xml version="1.0" encoding="utf-8"?>
<LinearLayout xmlns:android="http://schemas.android.com/apk/res/android"
    android:layout_width="match_parent"
    android:layout_height="match_parent"
    android:gravity="center_horizontal"
    android:orientation="vertical"
    android:padding="3dp" >

    <LinearLayout
        android:layout_width="match_parent"
        android:layout_height="wrap_content"
        android:orientation="horizontal" >

        <TextView
            android:layout_width="0dp"
            android:layout_height="match_parent"
            android:layout_weight="2"
            android:gravity="center_vertical"
            android:text="Client Id:" />

        <TextView
            android:id="@+id/tvClientId"
            android:layout_width="0dp"
            android:layout_height="match_parent"
            android:layout_weight="5"
            android:gravity="center_vertical" />
    </LinearLayout>

    <LinearLayout
        android:layout_width="match_parent"
        android:layout_height="wrap_content"
        android:orientation="horizontal" >

        <TextView
            android:layout_width="0dp"
            android:layout_height="match_parent"
            android:layout_weight="2"
            android:gravity="center_vertical"
            android:text="Status:" />

        <TextView
            android:id="@+id/tvStatus"
            android:layout_width="0dp"
            android:layout_height="match_parent"
            android:layout_weight="5"
            android:gravity="center_vertical"
            android:text="Disconnected" />
    </LinearLayout>

    <LinearLayout
        android:layout_width="match_parent"
        android:layout_height="wrap_content"
        android:orientation="horizontal" >

        <Button
            android:id="@+id/btnConnect"
            android:layout_width="0dp"
            android:layout_weight="6"
            android:layout_height="wrap_content"
            android:layout_gravity="left"
            android:text="Connect" />

        <Button
            android:id="@+id/btnDisconnect"
            android:layout_width="0dp"
            android:layout_weight="4"
            android:layout_height="wrap_content"
            android:layout_gravity="right"
            android:text="Disconnect" />
    </LinearLayout>

    <LinearLayout
        android:layout_width="match_parent"
        android:layout_height="wrap_content"
        android:orientation="horizontal" >

        <EditText
            android:id="@+id/txtSubscribe"
            android:layout_width="0dp"
            android:layout_height="match_parent"
            android:layout_weight="5"
            android:gravity="center_vertical"
            android:hint="Topic name" />

        <Button
            android:id="@+id/btnSubscribe"
            android:layout_width="0dp"
            android:layout_height="wrap_content"
            android:layout_weight="2"
            android:text="Subscribe" />
    </LinearLayout>

    <LinearLayout
        android:layout_width="match_parent"
        android:layout_height="wrap_content"
        android:orientation="horizontal" >

        <TextView
            android:layout_width="0dp"
            android:layout_height="match_parent"
            android:layout_weight="2"
            android:gravity="center_vertical|top"
            android:text="Last message:" />

        <TextView
            android:id="@+id/tvLastMessage"
            android:layout_width="0dp"
            android:layout_height="match_parent"
            android:layout_weight="5"
            android:gravity="center_vertical|top"
            android:text="N/A" />
    </LinearLayout>

    <LinearLayout
        android:layout_width="match_parent"
        android:layout_height="wrap_content"
        android:orientation="horizontal" >

        <TextView
            android:layout_width="0dp"
            android:layout_height="match_parent"
            android:layout_weight="2"
            android:gravity="center_vertical"
            android:text="Topic:" />

        <EditText
            android:id="@+id/txtTopic"
            android:layout_width="0dp"
            android:layout_height="match_parent"
            android:layout_weight="5"
            android:gravity="center_vertical" />
    </LinearLayout>

    <LinearLayout
        android:layout_width="match_parent"
        android:layout_height="0dp"
        android:layout_weight="1"
        android:orientation="horizontal" >

        <TextView
            android:layout_width="0dp"
            android:layout_height="match_parent"
            android:layout_weight="2"
            android:gravity="center_vertical"
            android:text="Message:" />

        <EditText
            android:id="@+id/txtMessage"
            android:layout_width="0dp"
            android:layout_height="match_parent"
            android:layout_weight="5"
            android:gravity="center_vertical" />
    </LinearLayout>

    <Button
        android:id="@+id/btnPublish"
        android:layout_width="match_parent"
        android:layout_height="wrap_content"
        android:layout_gravity="left"
        android:text="Publish" />

</LinearLayout>
Activity
In the main activity, there are some variables to be changed, they are:
- CUSTOMER_SPECIFIC_ENDPOINT - The endpoint of your AWS IoT Core created thing.
- COGNITO_POOL_ID - Is the Id of the Cognito Identity Pool that you have created.
MY_REGION - Your Thing was created in some of the AWS availability zones, please note where you've created it. This java code is very simple and can be extended for many IoT android projects, firstly in the onCreate method all the view elements will be bound with the attributes of the activity java class, and two important classes for our project will be instantiated.
CognitoCachingCredentialsProvider - That's the class from AWS SDK that will grant access to all your unauthenticated devices, if the cognito id was passed correct, and region a token will be given to the device.
- AWSIotMqttManager - The MQTT manager that will handle all the connections, and if the access to AWS services is granted by CognitoCachingCredentialsProvider, the connect method will be called, passing a callback that monitors the status change of the connection. Note that on this part of the code the process when the status change will not block the UI, so it can be ran on UI Thread.
Also onCreate method the buttons for subscribing and publishing a topic will be assigned to a callback, to trigger the events:
- subscribeClick - When the subscribe button is pressed, a topic will be subscribed and a callback for new arriving messages will be created. Now you can receive messages from other devices!
- publishClick - When this button is pressed, the message will be published on the correspondent topic.
- disconnectClick - To disconnect from your endpoint, and connect in another.
The activity code can be seen above:
package com.amazonaws.demo.androidpubsubwebsocket;

import android.app.Activity;
import android.os.Bundle;
import android.util.Log;
import android.view.View;
import android.widget.Button;
import android.widget.EditText;
import android.widget.TextView;
import java.io.UnsupportedEncodingException;
import java.util.UUID;

import com.amazonaws.auth.CognitoCachingCredentialsProvider;
import com.amazonaws.mobileconnectors.iot.AWSIotMqttClientStatusCallback;
import com.amazonaws.mobileconnectors.iot.AWSIotMqttManager;
import com.amazonaws.mobileconnectors.iot.AWSIotMqttNewMessageCallback;
import com.amazonaws.mobileconnectors.iot.AWSIotMqttQos;
import com.amazonaws.regions.Regions;

public class PubSubActivity extends Activity {

    static final String LOG_TAG = PubSubActivity.class.getCanonicalName();

    // --- Constants to modify per your configuration ---

    // Customer specific IoT endpoint
    // AWS Iot CLI describe-endpoint call returns: XXXXXXXXXX.iot.<region>.amazonaws.com,
    private static final String CUSTOMER_SPECIFIC_ENDPOINT = "CHANGE_ME";

    // Cognito pool ID. For this app, pool needs to be unauthenticated pool with
    // AWS IoT permissions.
    private static final String COGNITO_POOL_ID = "CHANGE_ME";

    // Region of AWS IoT
    private static final Regions MY_REGION = Regions.US_EAST_1;

    EditText txtSubscribe;
    EditText txtTopic;
    EditText txtMessage;

    TextView tvLastMessage;
    TextView tvClientId;
    TextView tvStatus;

    Button btnConnect;
    Button btnSubscribe;
    Button btnPublish;
    Button btnDisconnect;

    AWSIotMqttManager mqttManager;
    String clientId;

    CognitoCachingCredentialsProvider credentialsProvider;

    @Override
    protected void onCreate(Bundle savedInstanceState) {
        super.onCreate(savedInstanceState);
        setContentView(R.layout.activity_main);

        txtSubscribe = (EditText) findViewById(R.id.txtSubscribe);
        txtTopic = (EditText) findViewById(R.id.txtTopic);
        txtMessage = (EditText) findViewById(R.id.txtMessage);

        tvLastMessage = (TextView) findViewById(R.id.tvLastMessage);
        tvClientId = (TextView) findViewById(R.id.tvClientId);
        tvStatus = (TextView) findViewById(R.id.tvStatus);

        btnConnect = (Button) findViewById(R.id.btnConnect);
        btnConnect.setOnClickListener(connectClick);
        btnConnect.setEnabled(false);

        btnSubscribe = (Button) findViewById(R.id.btnSubscribe);
        btnSubscribe.setOnClickListener(subscribeClick);

        btnPublish = (Button) findViewById(R.id.btnPublish);
        btnPublish.setOnClickListener(publishClick);

        btnDisconnect = (Button) findViewById(R.id.btnDisconnect);
        btnDisconnect.setOnClickListener(disconnectClick);

        // MQTT client IDs are required to be unique per AWS IoT account.
        // This UUID is "practically unique" but does not _guarantee_
        // uniqueness.
        clientId = UUID.randomUUID().toString();
        tvClientId.setText(clientId);

        // Initialize the AWS Cognito credentials provider
        credentialsProvider = new CognitoCachingCredentialsProvider(
                getApplicationContext(), // context
                COGNITO_POOL_ID, // Identity Pool ID
                MY_REGION // Region
        );

        // MQTT Client
        mqttManager = new AWSIotMqttManager(clientId, CUSTOMER_SPECIFIC_ENDPOINT);

        // The following block uses a Cognito credentials provider for authentication with AWS IoT.
        new Thread(new Runnable() {
            @Override
            public void run() {
                runOnUiThread(new Runnable() {
                    @Override
                    public void run() {
                        btnConnect.setEnabled(true);
                    }
                });
            }
        }).start();
    }

    View.OnClickListener connectClick = new View.OnClickListener() {
        @Override
        public void onClick(View v) {

            Log.d(LOG_TAG, "clientId = " + clientId);

            try {
                mqttManager.connect(credentialsProvider, new AWSIotMqttClientStatusCallback() {
                    @Override
                    public void onStatusChanged(final AWSIotMqttClientStatus status, final Throwable throwable) {
                        Log.d(LOG_TAG, "Status = " + String.valueOf(status));

                        runOnUiThread(new Runnable() {
                            @Override
                            public void run() {
                                if (status == AWSIotMqttClientStatus.Connecting) {
                                    tvStatus.setText("Connecting...");

                                } else if (status == AWSIotMqttClientStatus.Connected) {
                                    tvStatus.setText("Connected");

                                } else if (status == AWSIotMqttClientStatus.Reconnecting) {
                                    if (throwable != null) {
                                        Log.e(LOG_TAG, "Connection error.", throwable);
                                    }
                                    tvStatus.setText("Reconnecting");
                                } else if (status == AWSIotMqttClientStatus.ConnectionLost) {
                                    if (throwable != null) {
                                        Log.e(LOG_TAG, "Connection error.", throwable);
                                        throwable.printStackTrace();
                                    }
                                    tvStatus.setText("Disconnected");
                                } else {
                                    tvStatus.setText("Disconnected");

                                }
                            }
                        });
                    }
                });
            } catch (final Exception e) {
                Log.e(LOG_TAG, "Connection error.", e);
                tvStatus.setText("Error! " + e.getMessage());
            }
        }
    };

    View.OnClickListener subscribeClick = new View.OnClickListener() {
        @Override
        public void onClick(View v) {

            final String topic = txtSubscribe.getText().toString();

            Log.d(LOG_TAG, "topic = " + topic);

            try {
                mqttManager.subscribeToTopic(topic, AWSIotMqttQos.QOS0,
                        new AWSIotMqttNewMessageCallback() {
                            @Override
                            public void onMessageArrived(final String topic, final byte[] data) {
                                runOnUiThread(new Runnable() {
                                    @Override
                                    public void run() {
                                        try {
                                            String message = new String(data, "UTF-8");
                                            Log.d(LOG_TAG, "Message arrived:");
                                            Log.d(LOG_TAG, "   Topic: " + topic);
                                            Log.d(LOG_TAG, " Message: " + message);

                                            tvLastMessage.setText(message);

                                        } catch (UnsupportedEncodingException e) {
                                            Log.e(LOG_TAG, "Message encoding error.", e);
                                        }
                                    }
                                });
                            }
                        });
            } catch (Exception e) {
                Log.e(LOG_TAG, "Subscription error.", e);
            }
        }
    };

    View.OnClickListener publishClick = new View.OnClickListener() {
        @Override
        public void onClick(View v) {

            final String topic = txtTopic.getText().toString();
            final String msg = txtMessage.getText().toString();

            try {
                mqttManager.publishString(msg, topic, AWSIotMqttQos.QOS0);
            } catch (Exception e) {
                Log.e(LOG_TAG, "Publish error.", e);
            }

        }
    };

    View.OnClickListener disconnectClick = new View.OnClickListener() {
        @Override
        public void onClick(View v) {

            try {
                mqttManager.disconnect();
            } catch (Exception e) {
                Log.e(LOG_TAG, "Disconnect error.", e);
            }

        }
    };
}
So run the code, and if everything goes well, you will now have a simply way to establish communication between devices in the cloud, which is one of the core topics for most IoT projects.
Thanks for everything, and if you have some doubt or something to add to this article, just ping me!